
Adventure Escape Time Library is a puzzle and informative game from Haiku Games which is a studio that creates the best adventure escape games. Adventure Escape Time Library is a game where you should be able to solve the mystery and escape the Time Library.
Adventure Escape Time Library contains good graphics with a lot of quite difficult puzzles to give you an interesting adventure by keeping you searching for solutions and solving devious riddles through the adventure at every step of each chapter
The most interesting part of Adventure Escape Time Library is the challenge. But sometimes the challenge is so hard that you do not know how to get through a chapter in the game. This guide, therefore, provides you with Adventure Escape Time Library Walkthrough, Tips & Tricks to guide you through all of the chapters and if perhaps you ever get stuck somewhere.
As a player, you never want to spend hours stuck in the same chapter just because you were not able to solve some devious puzzles or riddles or figure out some combinations.
Adventure Escape Time Library Walkthrough
Adventure Escape Time Library contains nine chapters. In chapter one, you are in a library and it is a tutorial that teaches you how to play the game. It ends in chapter nine where you are in some kind of lab.
Adventure Escape Time Library tips
Here are some few tips before going on each chapter walkthrough:
- An important thing to know about the game is that stars help you when you get stuck and can be used to provide hints; therefore you should collect as many stars as you can.
- Find and collect items that will assist you to complete your adventure which you can select the on the right side of the screen
Time library walkthrough chapter 1
You should start by picking up useful things once inside the library.
Underneath the pile of books on the floor collect the can of oil and use it to open the cabinet/drawer on the left. When you open the drawer you will find a riddle which you need to answer.
The answer to the riddle is 06 as there are 5 girls of which each has only one brother, therefore they all share the same brother adding up to a total of six children.
The answer to the riddle unlocks the door. Input 06 on the door to unlock the door and leave.
When you leave you will have a conversation with Hiro. When your conversation with him is over, choose the book named “Surprising Alchemy.”
Collecting Stars
- After you open the drawer there are five stars that will appear. Collect them
- There is one star up on the second bookshelf from the left
- There is another star on the window on the right side of the screen
- After you open the door there are five more stars
Time library walkthrough chapter 2
In chapter 2 you start outside a house. You should start by collecting the book lying down the grass.
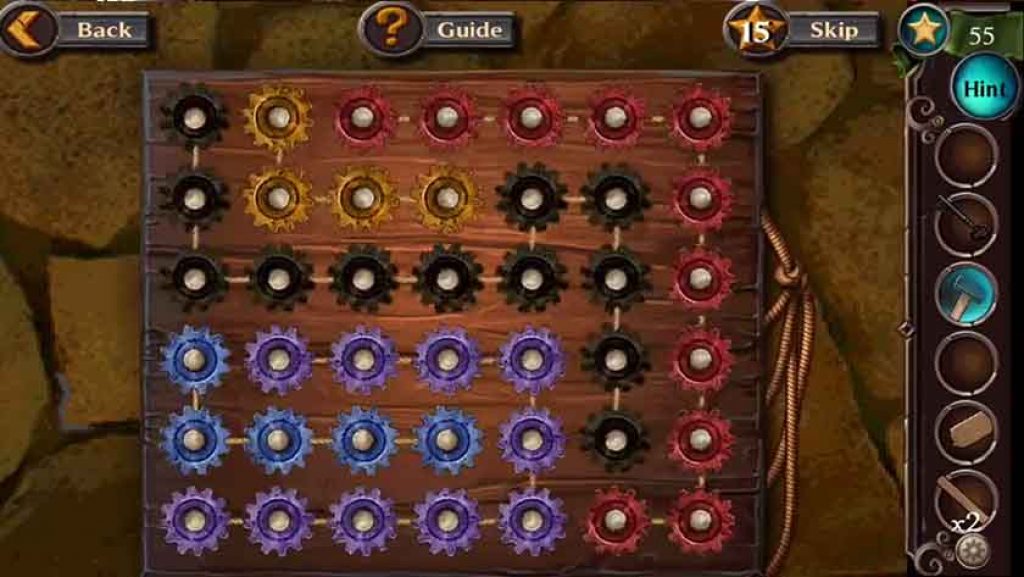
On the door, there is a puzzle with pieces which you should solve. First, read the riddle on the left side to know how to solve it. On the puzzle there are pieces that are locked in and the other pieces can be tapped once or twice to turn them to lead or gold.
To unlock the door you can use the below photo to solve the puzzle
Once the door unlocks, move in and on the right tap where you see 4 flasks/vials. This is another puzzle. Inside the three beakers, you need to pour the mixture and make them measure to 2, 2 and 3 ounces each so that you can cook and form the correct ingredient.
To solve it you have to the liquid back and forth until the vials contain 2, 2 and 3 in the last.
- That is from the 7-ounce vial pour it into the 3-ounce vial (7 to 3)
- The remaining liquid in the 7-ounce vial pour it into the 4-ounce vial (7 to 4)
- Take the 3-ounce vial and pour the liquid in it back to the 7-ounce vial (3 to 7)
- Take the 4-ounce vial and pour the liquid into the 3-ounce vial (4 to 3)
- Then the 3-ounce vial into the 7-ounce vial (3 to 7)
- From the 4 ounce vial into the 3-ounce vial (4 to 3)
- Then from the 7 ounces into the 4 ounces (7 to 4)
- Lastly from the 4 ounces into the 3 ounces (4 to 3)
Once you have the 2, 2 and 3 proportion you will pour it into the empty flask to make a pink portion which you should take
Pick up the book on the stand and next to the stand there are papers which you must move and collect a key
On the left, there is a locked door which you should unlock using the key you have just collected and head in
Inside the room, collect a scroll and another book from the shelf then open the drawer below the shelf and collect a pink portion then head back to the other room
On the wall, there is a ripped chart. Take the scroll and place it over the ripped one to get a recipe for which you need three potions but you only have two only
To find and collect the other portion, place the 3 books you collected on the 3 spaces in the shelf.
Now in the order shown on the poster, place all three potions on the table to get a Time Crystal.
Collecting Stars
- At the beginning of the chapter, outside the house, there is a star on the tree on the right
- There is one star on the window outside
- On the left side, there is hole below which contains a star
- When you collect the first book there is a star that pops out
- Once you have completed the vials puzzles, there are five stars that appear
- After combining the 3 portions there are 5 stars the emerge
Time library walkthrough chapter 3
On the right, collect the lump of iron and also the cannon wheel.
On the left side, there is a number 457 written on the wall. Input this code the chest ahead to collect a magnifying glass
Place the cannon wheel you collected onto the cannon and then put the lump of iron on the ground next to the crack.
Light up the cannon’s fuse using the magnifying glass. The cannon will roll back over the lump of iron, creating a makeshift crowbar which you should collect after moving back the cannon.
There is a trap door on the floor. Use the makeshift crowbar to open it and head down
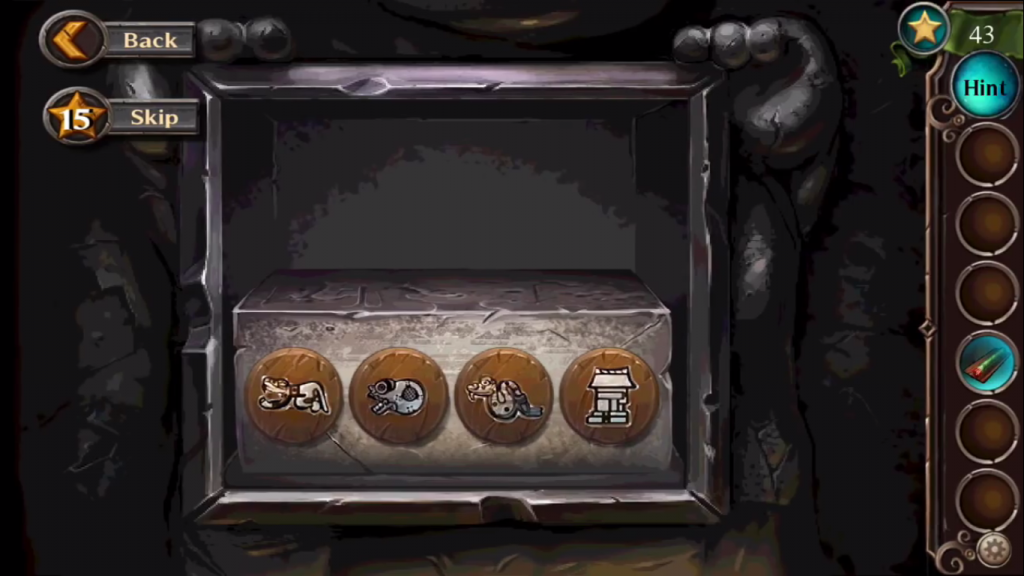
Inside the room you just entered, there is a barrel on the left. Smash the barrel using the makeshift crowbar and collect the seeds. Feed the seeds to the parrot in the cage and it will speak out some digits i.e. 4, 3, 1, 8.
Input these digits on the circular things on the wall and a picture will slide to the left side revealing a puzzle. Here you need to keep moving the pieces to the last pole with a star under it to reform the pyramid on the first pole(longest piece below and the shortest piece above)
After completing the puzzle you will receive a note saying ‘Sun, Ocean, Grass’
On the door on the left, there are 3 discs colored purple. Click on the first disc until it is red, the second blue and the third green to unlock it. These are colors of the sun, ocean, and grass respectively. The parrot will speak out ‘Get me the bottle above the 2-year-old rum!’
Inside this room, collect the magnet on the floor and on the left below you will see a hole which could be an air vent sparkling. Use the magnet to collect a magnetic key from the vent.
Use this magnetic key to open up the locked barrel on the left and collect a bottle of rum.
There is a gap on the floor. Use your makeshift crowbar to bust open the floor and find another bottle of rum
On the top right corner of the wall, you will see Xs. Some are colored while others are not. This is a puzzle for the locked chest. From the arrangement, red is second, yellow is fifth, purple is sixth and green is ninth therefore the answer to the puzzle is 2569.
Input this code on the chest and collect the third bottle of ram.
Now move to the shelf where there is another puzzle to be solved. Place the 3 bottles of ram you collected on the shelf with the others. Each row and column on the shelf should add up to 100. To do this, arrange the bottles in this order:
| 49 | 36 | 11 | 4 |
| 10 | 5 | 48 | 37 |
| 39 | 46 | 1 | 14 |
| 2 | 13 | 40 | 45 |
After solving this puzzle you will be given a bottle of rum which you should give the parrot. The parrot will give you a parrot key that you should use to unlock the door in the other room and head through.
Here collect the pirate hook from the table and the stick from the ground. These two will get attached once you collect them both forming a stick with a hook.
On the right, on top of the barrel, there is a note with a clue that says “Waxing Gibbous, Full Moon, Waning Gibbous, Waning Crescent”
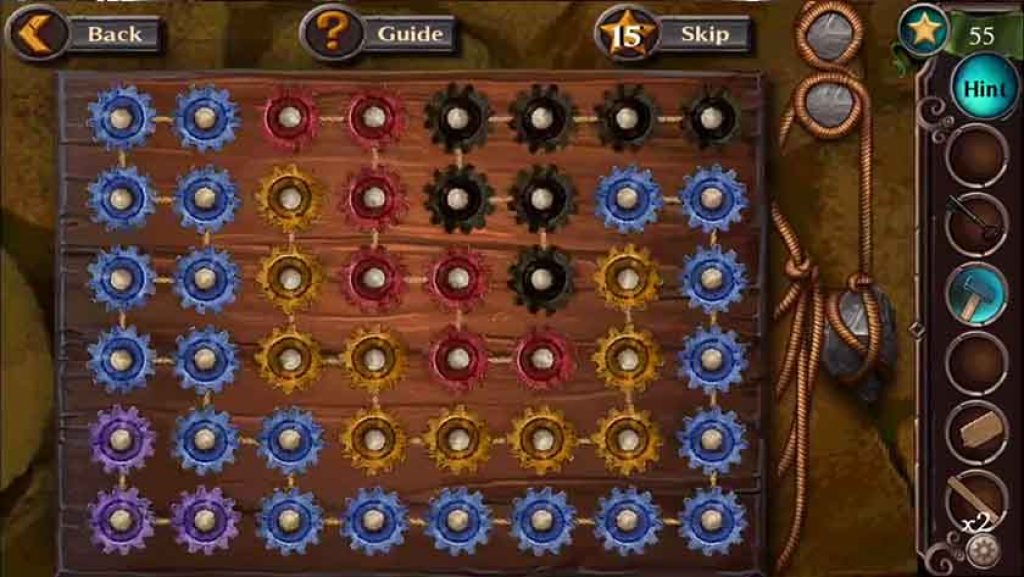
Use the stick with the hook to reach the hook on the ceiling so that you can reveal a number of clocks. These clocks are the clue to opening the box on the table.
On each shelf, the first clock is on 12 i.e. 0. On the first row, the second clock and the third clock are on 1 and 2 respectively therefore if you add these together you get 3. The second row is 3 and 6 which becomes 9 and the last row is 10 and 8 which comes to 18. But because it is a clock you must subtract 12 from 18 to get 6. Therefore the code is 396. Input this code on the box to unlock it.
Inside the box is a clue. Now use the clue from the barrel with the four moon cycles and the clue you just found inside the box to solve the wheel puzzle and get the time crystal to complete the chapter.
The wheel puzzle should be like this:

Collecting Stars
- At the beginning of the chapter, there is a lamp at the left corner containing a star
- After opening the trapdoor there are 5 stars that emerge
- When you have completed the pyramid puzzle there are 3 stars that appear
- Inside the bottles of ram room, there is a star on top of the box on the left corner and another one on the barrel on the right
- After you have burst the floor open to get the ram, there is a star inside there
- When you unlocked the door using the parrot key, there are 5 stars that emerge
Time library walkthrough chapter 4
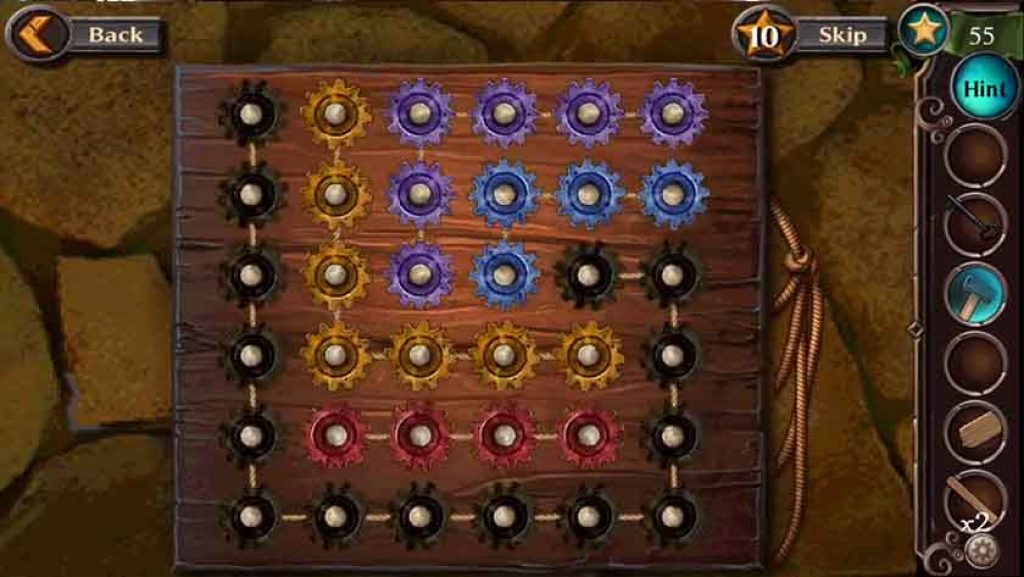
Start by lifting up the circular carpet on the floor to find a gear puzzle.
At the top of the staircase, there is a door. Go through it and collect the delicious meal and a long hook.
Tap on the curtain to find a Pomeranian which you should feed using the delicious meal to collect it. Place it on the table for it to get there gear on the wall.
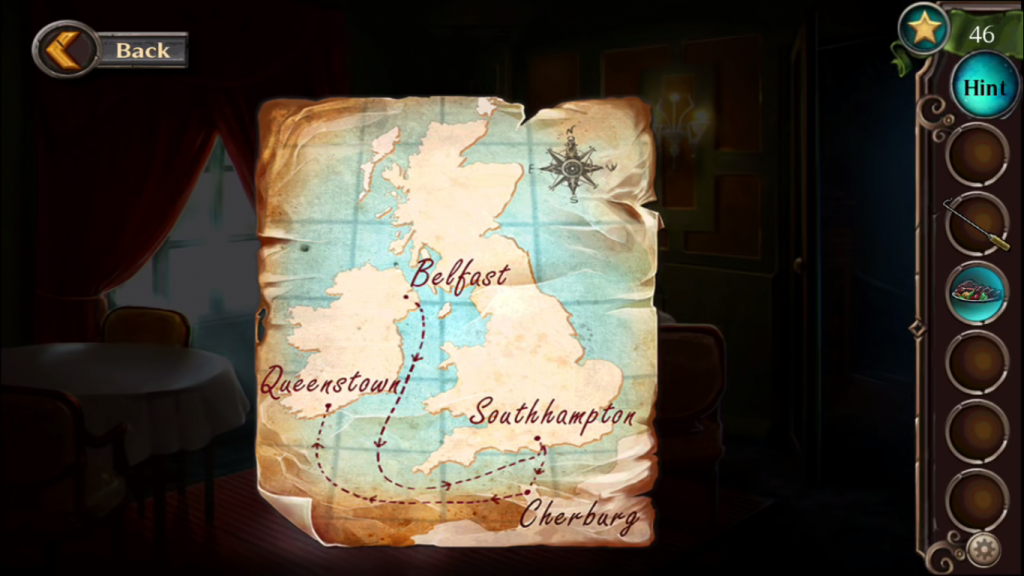
On the table, there is a map that you should piece together and find a clue. The map should look be similar to the one below
Head back to the previous room and on the gear puzzle, use the collected gear together with the other gears and set them in the correct spots and a ladder will appear
Now equip and use the long hook to get to the two lanterns in the room whereby one will bring down the chandelier crashing and you, therefore, cannot collect this yet.
There is a suitcase on the staircase. The clue to opening the case is the path on the map i.e. Belfast to Southampton to Cherbourg to Queenstown. Use the first letters of each word as the code. BSCQ is the code
Collect the lantern and thread and needle from inside the case.
Head back to the upper room and equip the needle and thread to use it to patch up the gloves on the floor then collect them.
Head back to the other room and use the gloves to collect the lantern from the broken chandelier.
Now head down the ladder and solve the lantern puzzle. To do this you should light up every square on the blueprint using the lanterns you contain.
Place the lanterns in the order below

Time library walkthrough chapter 5
On the floor collect the long knife, emergency food supplies, bedsheet, and dustpan.
By the door on the right, place the dustpan and use the knife to push through the keyhole. A key will drop from the keyhole to the dustpan and you should collect it
With the same key, unlock the door and pick up the hammer which you will see and use it to get the nails off the wooden planks.
Touch the drawer above the wooden planks to find a note and read it. The note contains a riddle which is a clue to unlocking the briefcase in the wall.
- Number the moons in our sky is 1.
- How many planets in our solar system fly? 8
- Consider the continents that have been made. 7.
- Which month was Caesar betrayed? Ides of March. 3
Therefore to unlock the briefcase you need to input the code 1873. The briefcase contains a diamond which falls through the hole in the wall.
You need to retrieve the diamond. Put the bedsheet on the pillar near the bed and using the nails, nail it into a rope. Put it in the hole and climb down
Here you have to get Alice, Hiro, the dog and the emergency supplies inside the lifeboat.
- Place Alice and the dog on the raft and put the dog inside the boat.
- Head back to pick Hiro. Place Hiro inside the boat but take the dog back on the raft.
- Head back to the emergency supplies and swap out the dog for the emergency supplies.
- Get the emergency supplies inside the boat and head back for the dog and get him on the boat and later Alice
Collect the diamond to complete the chapter
Time library walkthrough chapter 6
Collect the red flowers and mixing bowl piece from the floor
On the wall, there is a puzzle with colored dials to be solved. You need to match each face to the same color on the dials next to it and when you finish a window will open. The puzzle should look like this:
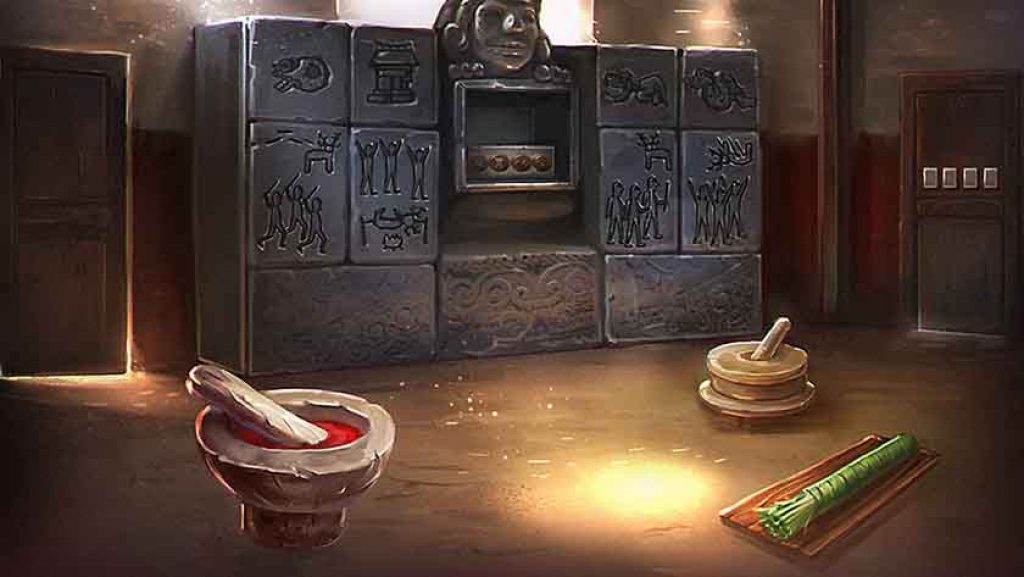
Now head through the door to the right and collect the yucca brush and the grinding stone from the floor
Place the collected mixing bowl piece with the other piece and insert the flowers in the bowl. Use the grinding stone to crush the flowers into a red paint. Use the yucca brush with the red paint.
Touch on the middle part of the stone structure and get ready to use your yucca brush with paint.
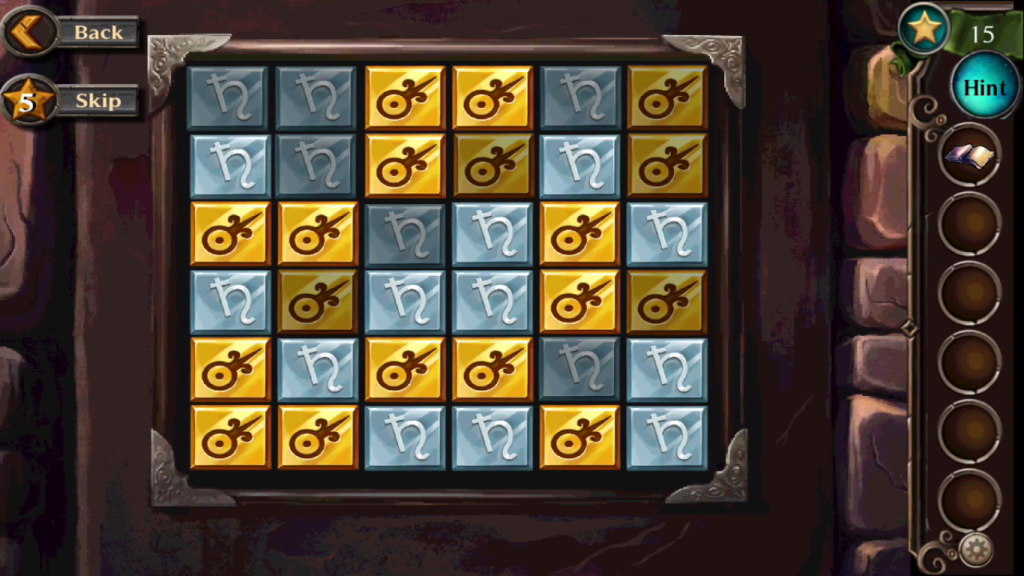
All available squares need to be red or white and when you touch a square once it makes it white, touching the square twice paints it red. Start with 0’s because they are surrounded by all white squares. 9’s are surrounded by red squares. To solve the puzzle, yours should look like this:
You now need to observe the etchings in the stones of the hunters hunting a deer and place them in the correct order. That is:
After you have arranged them, collect the Sundial style and head back to the previous room to set it on the sundial. On both sundials, check the time. On the first sundial, it is on 8:00 and it moves forward while the second sundial is on 11:00 and moves backward. Check at what time they meet up.
They meet up at 9:30 because when you add 1.5 hours to 8 pm and subtract 1.5 hours from 11 pm, they meet at 9:30. 9:30 is 0930hrs therefore you need to go to the other room and input this code on the door on the right to unlock the door finish this chapter
Time library walkthrough chapter 7
Collect the Aztec idol on the floor the click on the chart on the wall to solve the puzzle and get another Aztec idol. On the puzzle pay attention to the 10 dots for each diamond and multiply it based on all the other shapes. Therefore from top to bottom, it is 400, 20, 100 and 10 respectively.
Head through the door on the right and move the two pots on the right and collect a ceremonial knife which you should equip and cut a piece of the deerskin hanging on the wall
There is a slot on the floor where you need to insert the ceremonial knife to get another Aztec idol.
Head back to the previous room and place the deer skin on the missing side of the balancing scale. The rope on the scale is broken and need to be fixed. On the doorway there are vines. Use your knife to cut the vines and make a rope for the scale
Here there are a scales puzzles. To solve them, you have to refer to the sticky notes from the before puzzle and then weigh every single idol with a different one to find out one is lightest and heaviest. On the notes, it says 100, 150, 200, 250 and 300. So arrange them in order to solve the puzzle which is:
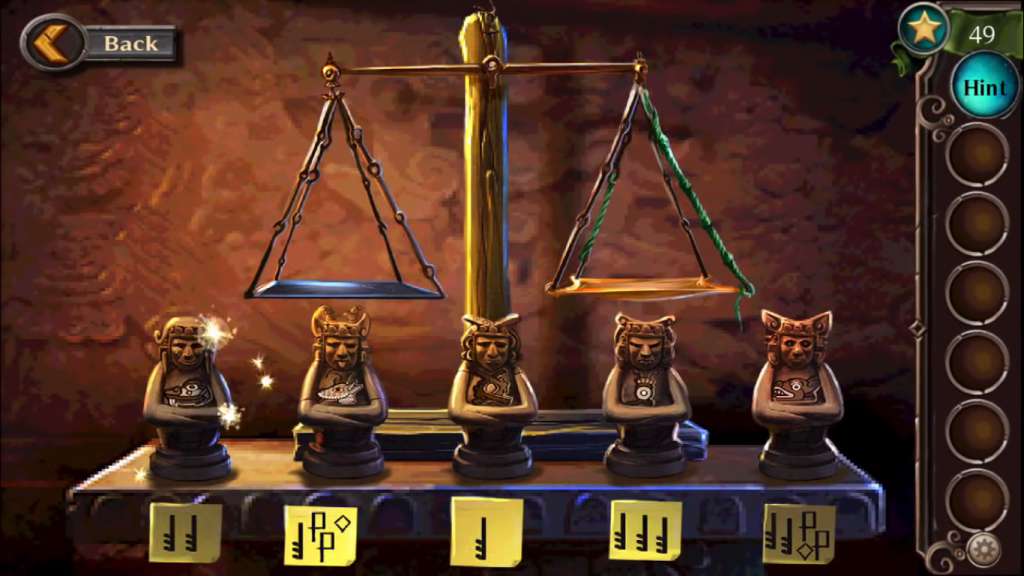
Collect all the Aztec idols from the scales and head to the other room. You must place four of Aztec idols on the pedestals (the drum-shaped things). On each pedestal, there are markings which tell you how much weight you need to put on there.
The left pedestal is 500 and the right pedestal is 400. So place the set the first and fourth idol on the left pedestal and then set the second and fifth idols on the right pedestal to make 500 and 400 consecutively. The statue’s eyes will star glowing
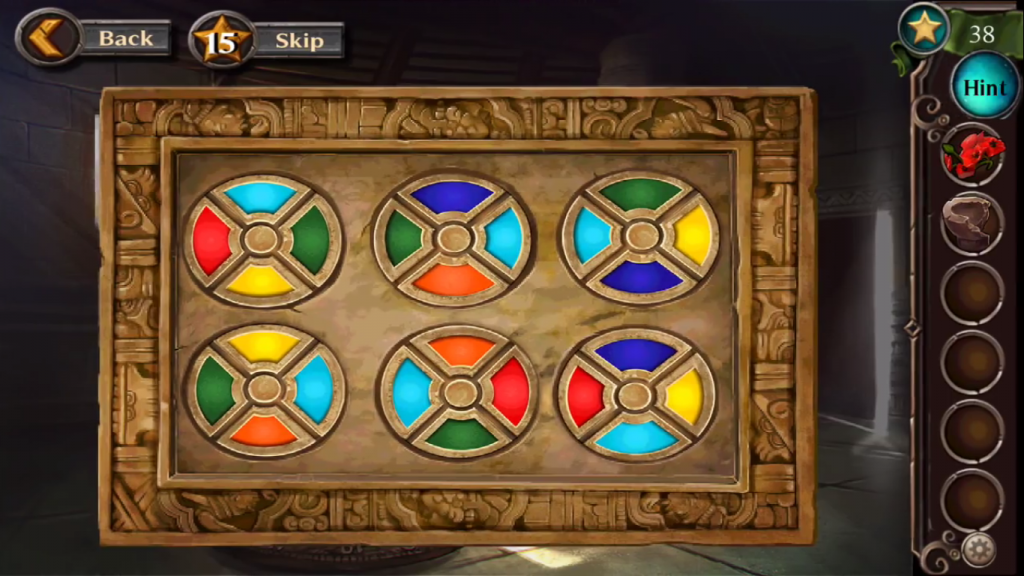
Stil,l on the statue, there is a puzzle on its chest that needs to be solved. What you need to do is just match up all the gems to the right colors and after that, the statue’s mouth will start glowing
Collect the time crystal and complete the chapter.
Time library walkthrough chapter 8
From the plate on the floor, collect the fish. Tap on the garbage next to the plate to move some of it and collect the twine. On the bed lift the sheets and collect the wooden peg.
There is a hungry cat outside the cell. Give it the stale fish. It will throw over some items and you will be able to collect a key and a plank.
Use the key to unlock the box outside the cell where you will find a hammer. Use this hammer to smash the cracked wall and head to the other room.
Near the broken bed, collect the wooden peg and remove the bedsheet and collect another wooden peg.
Above the be,d there is a gear puzzle where you need to connect the same colored gears so that you can solve it. The solution is:
 After the gear puzzle is solved, a plank falls. Collect it.
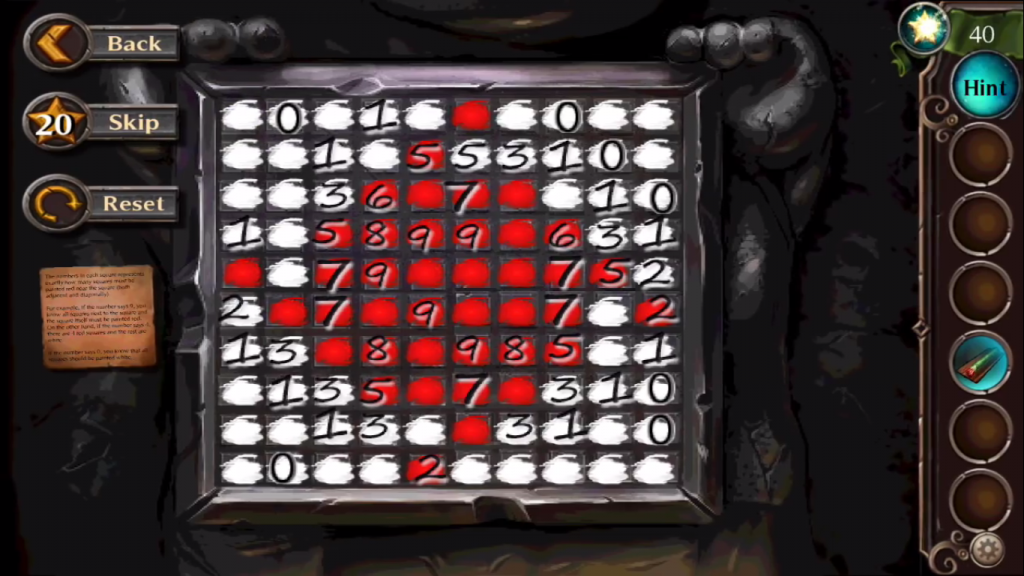
On the wall, there is a note with a riddle containing instructions to the puzzle on the floor.
You now need to set all the numbers on the board and with no two consecutive numbers next to each other. The solution of the puzzle is below
After you solve the puzzle, collect the fourth wooden peg inside the box.
Now put the two planks, the twine and the four wooden pegs on the workbench and use the hammer to create a makeshift ladder.
Collect the ladder and head back to the cell where you will use it to climb through the above window.
Time library walkthrough chapter 9
Collect the lemons from the bowl. Head through the door ahead to the other room and collect the pennies on the floor and the wires.
Head back to the previous room and you will see a phone on the table which does not have any batteries. Set the lemons, pennies, and wires on the table next to the phone and it will switch on
There is a code you need to input on the phone to unlock which is 2017 from the wall behind it.
After entering the code you will get a recipe.
Head back to the other room and finds the vials/flasks.
You need something to measure with. Head back to the first room and tap on the calendar to solve the puzzle where you need to fill in the missing digit which is 87. Input 87 on the safe below and collect a 2 Unit Vial then head back to the other room.
On the wall, there is a riddle. You should pay attention to the given numbers i.e. 235, 20 and 1. Enter this digit code in the safe below and collect a 5 unit vial.
Head back to the vial set and put the phone and 2 measuring vials on the table. Here you need to measure 5 units of blue, 3 units of green and 1 unit of red and pour it into the empty flask.
- So first pour from the blue into the 5 unit vial and pour that into the flask
- Pour the green into the 5 unit and from the 5 unit into the 2 unit.
- Pour the leftover 3 units in the 5 unit into the bottle and drain the 2 unit down the sink
- Pour the red into the 5 unit, then from the 5 into the 2 unit. Drain the 2 unit down the sink and then transfer from the 5 into the 2 again.
- You will now have 1 unit left in the 5 vial which you should pour into the flask to make the dissolving fluid.
Now use this fluid to dissolve the glue on the door to open it and head to the next room.
In this room, there are 2 clues on the wall, one with patterns and the other with numbers. You should figure them out to get a code for the locked safe. It is like a tic tac toe game where it brings out the code 976. Input this code in and you will get an electric manual.
- Move the fallen chair and collect a screwdriver.
- Equip the screwdriver and use it to open a panel on the bottom right.
Use the electric manual to figure out that you need to draw the path from B to D, lighting up the lights in the path. The path order should be like:
For every adventure escape fan, Adventure Escape Time Library is the game you should download to keep testing your brain. The above Adventure Escape Time Library Walkthrough will assist you to figure out all the hard spots in the game and solve them fast.